
Quick answer: PHP performance optimization for high-traffic sites comes down to five levers: run a current PHP version with OPcache enabled, add an object cache like Redis, tune PHP-FPM worker limits to your server’s real capacity, cut database query overhead, and profile before you guess. Sites that skip profiling almost always fix the wrong bottleneck first.
What You'll Learn
A PHP site that loads fine for ten visitors can fall apart at ten thousand. The code did not get slower. The bottlenecks that were invisible at low traffic (database contention, process limits, disk I/O) suddenly decide how fast every page loads. This guide walks through the fixes that actually move the needle, in the order a developer should apply them.
Why PHP Performance Optimization Matters for High-Traffic Sites
Most PHP slowdowns at scale are not caused by inefficient code. They come from resource contention: too few PHP-FPM workers, unindexed database queries running thousands of times per minute, or a cache layer that does not exist. Low-traffic testing hides all three because there is never enough concurrent load to expose them. Getting PHP performance optimization right means fixing resource contention before touching a single line of application code.
Before changing anything, confirm where time is actually going. A profiler beats intuition every time, and Step 7 below covers exactly how to run one.
Step 1: Run a Current PHP Version
Version upgrades are the simplest lever in PHP performance optimization, and often the most overlooked. PHP 8.x carries substantial performance gains over PHP 7.x through the JIT compiler and internal engine improvements. Sites still on PHP 7.4 are leaving real throughput on the table, on top of running an unsupported, unpatched version.
- Confirm your version with
php -vat the server command line, or check it in your hosting control panel under PHP settings. - On cPanel hosting, switch versions through MultiPHP Manager. If you are not sure where that lives, our guide on enabling PHP modules in cPanel walks through the same panel.
- On a VPS with WHM, the equivalent is WHM > MultiPHP Manager, covered in our enabling PHP modules via WHM guide.
- Test staging on the newer version first. Deprecated functions and outdated plugins are the usual blockers.
- Move one major version at a time (7.4 to 8.1, not 7.4 to 8.4 in one jump) to isolate compatibility issues.
Step 2: Enable and Configure OPcache
OPcache stores precompiled PHP bytecode in memory so the server does not re-parse every script on every request. It ships with PHP but is often left at default settings, which undersize memory for busy sites. The full list of directives is in the official PHP OPcache documentation.
Where this code goes depends on your hosting setup:
- Shared or managed cPanel hosting: go to cPanel > MultiPHP INI Editor, select your domain, switch to Editor Mode, and add or edit the settings below directly in that text box. Save, then the change applies immediately without a server restart.
- VPS or dedicated server (Ubuntu/CentOS): edit the OPcache config file directly, typically
/etc/php/8.2/fpm/conf.d/10-opcache.ini(path varies by PHP version and OS). After saving, restart PHP-FPM:sudo systemctl restart php8.2-fpm. - No file access at all (basic shared hosting): add the settings to your account’s
php.inior.user.inifile in the site’s root directory if your host allows custom PHP directives; otherwise ask your host to enable and size OPcache for you.
opcache.enable=1
opcache.memory_consumption=256
opcache.interned_strings_buffer=16
opcache.max_accelerated_files=20000
opcache.validate_timestamps=0
opcache.revalidate_freq=0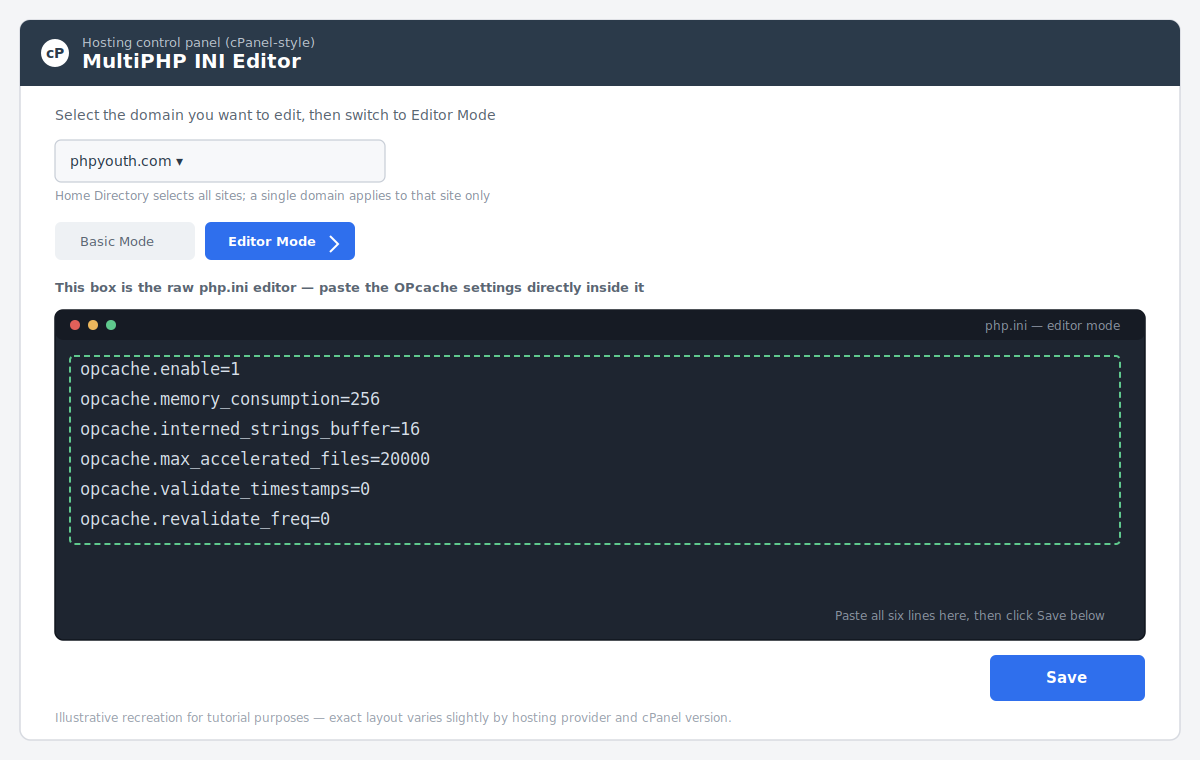
validate_timestamps=0 gives the biggest gain but means OPcache will not notice file changes until it is manually cleared or PHP-FPM is restarted. Use it in production only if your deploy process restarts PHP-FPM (or calls opcache_reset()) after every code change.
Step 3: Add an Object Cache
OPcache speeds up PHP execution. It does nothing for repeated database queries. That is where an object cache like Redis or Memcached comes in, storing query results and computed data in memory instead of hitting MySQL on every request.
Setup depends on your stack:
- WordPress sites: first confirm your host has Redis installed server-side (most managed WordPress hosts do; ask if you are unsure). Then install a persistent object cache plugin (Redis Object Cache is the common choice) from Plugins > Add New, activate it, and click “Enable Object Cache” on its settings page. The plugin drops an
object-cache.phpfile into yourwp-contentfolder automatically. This pairs naturally with the caching setup in our best WordPress caching plugins guide, since page caching and object caching solve different parts of the same problem. - Custom PHP applications: install the Redis server (
apt install redis-serveron Ubuntu, or your host’s equivalent), then install the PHP Redis extension (phpredisor thepredisComposer package). Connect in code near your application bootstrap, typically in a config or service-container file, not scattered inside individual controllers. - Set sensible expiration times on every cached key. A stale cache is a bug; an overly short one defeats the purpose.
Step 4: Fix the Database Before the Code
Slow queries are the single most common cause of high-traffic slowdowns. A query that takes 40ms is invisible at low volume and crippling at 500 requests per second. Database fixes are frequently the highest-leverage step in PHP performance optimization, since one slow query can throttle an otherwise well-tuned server.
- Run
EXPLAINin front of your slowest queries (via phpMyAdmin’s SQL tab or the MySQL command line) and add indexes where the query planner shows a full table scan. - Avoid
SELECT *; pull only the columns you need. - Batch inserts and updates instead of looping single-row queries.
- Use connection pooling if your framework or hosting stack supports it, to avoid the overhead of opening a fresh connection per request.
Step 5: Tune PHP-FPM to Match Server Capacity
PHP-FPM tuning is where PHP performance optimization meets real server capacity. Get this wrong and every other fix underperforms. PHP-FPM controls how many PHP processes can run at once. Set the worker count too low and requests queue up under load. Set it too high and the server runs out of memory and starts swapping, which is worse.
Where to edit this: on a VPS, the pool configuration file is usually /etc/php/8.2/fpm/pool.d/www.conf (again, path varies by PHP version). On managed or cPanel hosting, this is normally handled through the host’s PHP-FPM settings panel, since direct file access is often restricted; contact support if you cannot find it.
pm = dynamic
pm.max_children = 50
pm.start_servers = 10
pm.min_spare_servers = 5
pm.max_spare_servers = 20
pm.max_requests = 500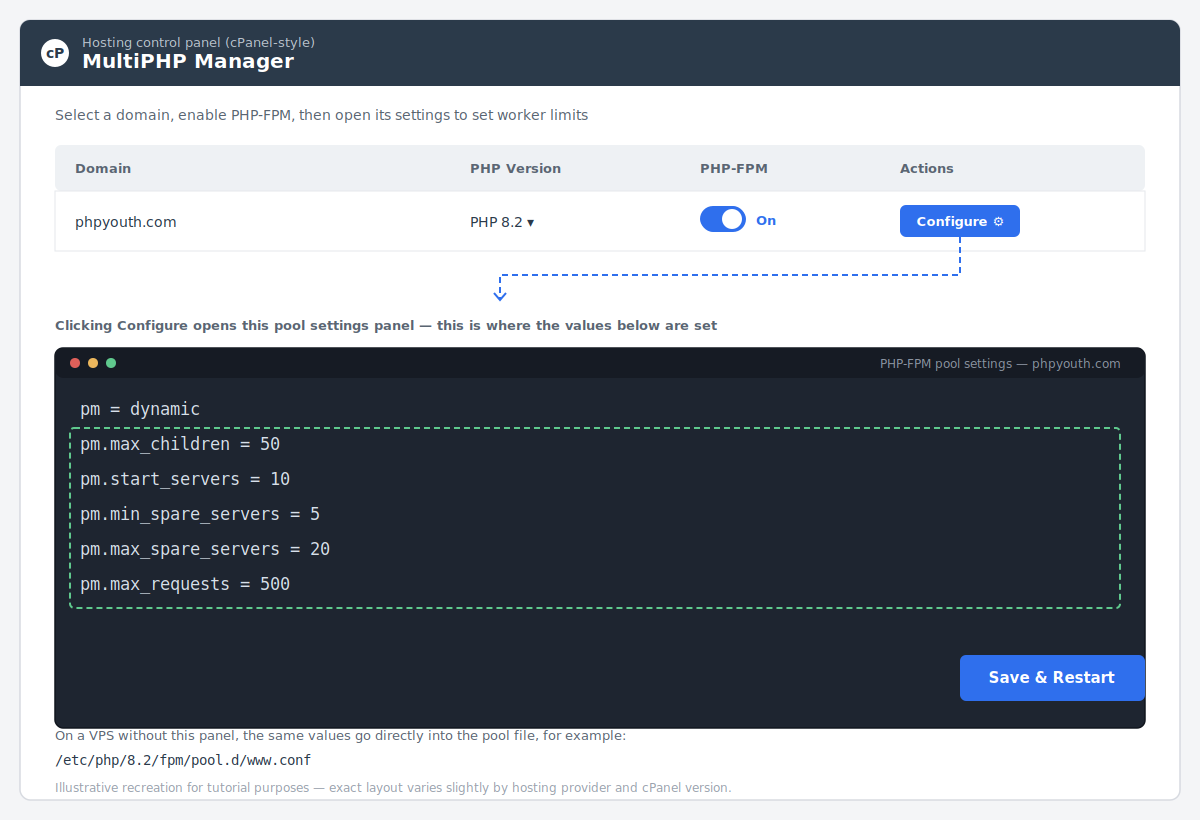
After editing the pool file directly, apply the change with sudo systemctl restart php8.2-fpm. A rough starting formula: max_children = available RAM for PHP ÷ average memory per PHP process. Check actual per-process memory with your hosting panel or the ps command rather than guessing, since it varies widely by application. If you are choosing hosting with this kind of tuning in mind, our best hosting for WooCommerce comparison covers which providers give you this level of server access.
Step 6: Add a Full-Page Cache or Reverse Proxy
For content that is the same for every visitor, skip PHP entirely on repeat requests. A full-page cache serves cached HTML directly, so PHP only runs for uncached or dynamic requests. This single change often produces the largest visible speed improvement, because it removes PHP execution, database queries, and object cache lookups from the request entirely for cached pages.
- LiteSpeed hosting: install the LiteSpeed Cache plugin (WordPress) or enable LSCache at the server level; no separate proxy server needed.
- Nginx or Apache on a VPS: Varnish sits in front as a reverse proxy. Its rules live in
/etc/varnish/default.vcl, and Varnish itself listens on port 80 while your web server moves to a backend port (commonly 8080). - Either way, this is plugin- or server-level configuration, not something you add inline in your application code.
For a full walkthrough of caching plugin choices and setup, see our WordPress caching plugins comparison, and pair it with our Core Web Vitals guide if page speed scores are the goal.
Step 7: Profile Your Site to Confirm What’s Actually Slow
Once Steps 1 through 6 are in place, stop guessing and measure. Profiling shows exactly which functions and queries eat the most time under real load, so you fix the real bottleneck instead of the one you assumed.
Two practical ways to do this:
- Xdebug’s built-in profiler (free, self-hosted): install the Xdebug extension, then set
xdebug.mode=profilein yourphp.ini(same file locations as Step 2). Load a page, and Xdebug writes acachegrind.outfile to your configured output directory. Open that file in a viewer like QCachegrind or KCachegrind to see a call graph ranked by time spent. - Blackfire or New Relic (hosted, more detail, less setup): create an account, install the small probe/agent they provide for your server, and trigger a profile either from their browser toolbar button or their CLI wrapper around a request. Both give you a ranked list of slow functions and queries without manually reading cachegrind files.
Either way, the workflow is the same: profile under conditions close to real traffic (not a single local request), fix the top one or two bottlenecks the report shows, then profile again. Watch specifically for N+1 query patterns, a common and expensive mistake where a loop fetches related data one record at a time instead of in a single query. Profiling is the last step in PHP performance optimization because it confirms whether the previous six steps actually worked.
Common Mistakes That Undo Performance Gains
These mistakes quietly undo PHP performance optimization work even after every step above has been done correctly.
- Caching without invalidation. A cache that serves stale data breaks user trust faster than a slow page does.
- Over-provisioning PHP-FPM workers beyond what RAM supports, causing swap and worse latency than fewer workers would.
- Skipping staging tests before a PHP version upgrade, leading to fatal errors in production.
- Optimizing code before profiling, which often means fixing something that was never the actual bottleneck.
Frequently Asked Questions
What is the biggest cause of PHP performance issues on high-traffic sites?
Database query overhead and undersized PHP-FPM worker limits cause most slowdowns, not inefficient PHP code itself. That is why PHP performance optimization should start with the database and server layer, not the codebase.
Does upgrading the PHP version really improve speed?
Yes. Moving from PHP 7.4 to a current PHP 8.x release delivers measurable throughput gains from the JIT compiler and core engine improvements, in addition to security support.
Is OPcache enough, or do I need Redis too?
OPcache and Redis solve different problems. OPcache speeds up PHP script execution. Redis reduces repeated database queries. High-traffic sites benefit from both.
How many PHP-FPM workers should I run?
Divide the RAM available to PHP by the average memory footprint of one PHP process. Check real memory usage on your server rather than using a generic default.
Get Expert Help With PHP Performance
Diagnosing PHP bottlenecks under real traffic takes server access, profiling tools, and experience reading the results correctly. PHP Youth’s development team handles PHP performance optimization audits, PHP-FPM and server tuning, caching architecture, and full-stack WordPress and custom PHP optimization for businesses and agencies worldwide.
Contact PHP Youth today for a performance audit or custom web development support, and get your high-traffic site running the way it should.
Discover more from Master WordPress with Free Tutorials & Guides
Subscribe to get the latest posts sent to your email.

2 thoughts on “How to Optimize PHP Performance for High-Traffic Sites”
Pingback: Enable PHP Extensions in cPanel
Pingback: How to Enable PHP Modules in WHM