

Quick answer: To enable PHP extensions in cPanel, go to Software > Select PHP Version, tick the checkbox next to the extension you need, and click Save. If the extension you need isn’t in that checklist (some less common ones aren’t), you can install it manually through the PHP PEAR Package manager instead.
What You'll Learn
Most WordPress errors that mention a missing PHP extension, things like “Call to undefined function,” a blank plugin settings page, or a failed image upload, come down to one extension not being switched on. The full list of core and optional extensions is documented in the official PHP extensions manual. The fix takes under two minutes once you know where to look.
Two Ways to Enable PHP Extensions in cPanel
cPanel gives you two paths, and which one you need depends on the extension:
- Select PHP Version (the checkbox method): covers the common extensions most sites need, mbstring, curl, gd, zip, opcache, intl, and more. This is the method to try first.
- PHP PEAR Package manager: for less common extensions that don’t appear in the checklist, like Archive_Zip on older PHP builds. This installs the extension itself before it can be enabled.
Method 1: Enable an Extension via Select PHP Version
- Log in to cPanel and open Software > Select PHP Version.
- If your account manages more than one domain, confirm you’re editing the right one from the domain dropdown at the top.
- Scroll through the extension list and tick the checkbox next to the one you need. Extensions are listed alphabetically, so mbstring and mysqli sit near each other, for example.
- Click Save. cPanel applies the change immediately, no server restart needed.
- Confirm it worked by checking the PHP info page (see the verification section below).
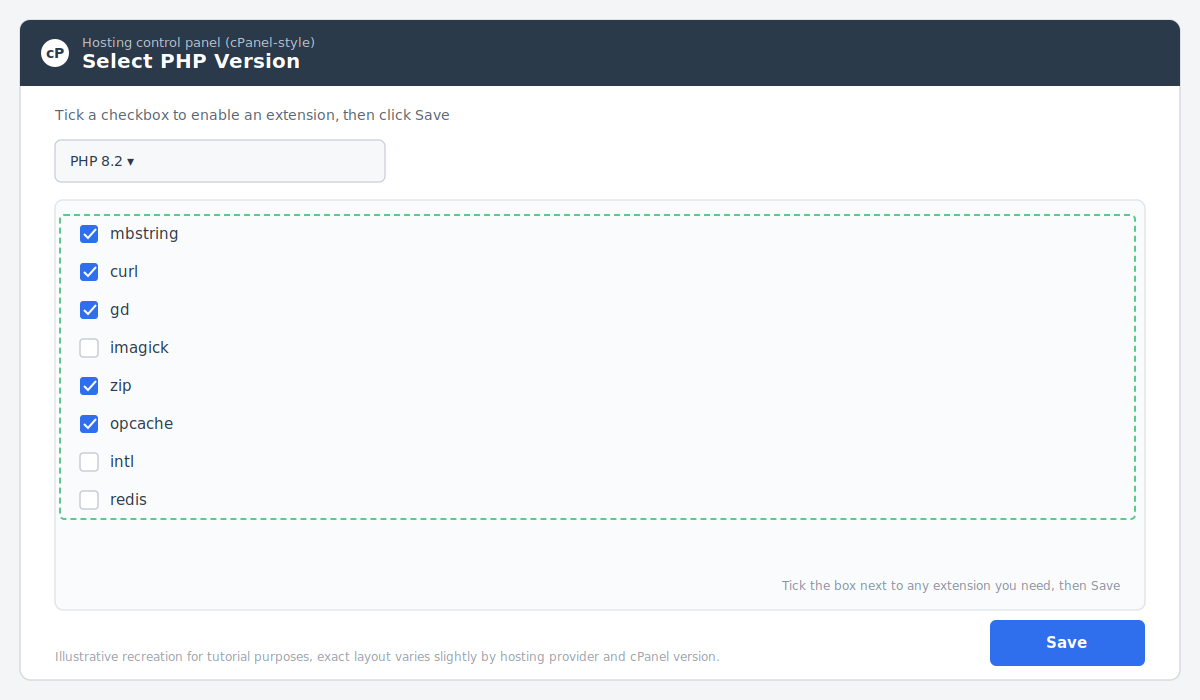
Some hosts label this interface slightly differently, MultiPHP Manager or PHP Selector are common alternate names, but the checkbox workflow is the same everywhere.
Method 2: Install an Extension via PHP PEAR Package
If the extension you need isn’t in the Select PHP Version checklist, PEAR (PHP Extension and Application Repository) can often install it directly.
- In cPanel, go to Software > Select PHP Version and click Options, then find the PEAR Package link (some cPanel versions list this as a separate icon on the Software page).
- Type the extension name into the search box. For example, search “Zip” to find Archive_Zip.
- Click the install icon next to the matching result.
- Once installation finishes, go back to Select PHP Version and confirm the new extension now appears and is checked.
PEAR installs are less common on modern PHP 8.x builds since most extensions people need now ship as native checkboxes, but it’s still the right tool for older or niche packages.
Common PHP Extensions and What They Fix
These are the extensions you’ll most often need to enable PHP extensions in cPanel for:
- mbstring, required by WordPress core and most plugins for handling non-English characters correctly.
- curl, needed for any plugin or theme that connects to an external API, license checks and update systems included.
- gd or imagick, for image processing, thumbnails, and resizing. Most WooCommerce and gallery plugins need one of these.
- zip, required for installing plugins, themes, and core updates through the WordPress dashboard.
- opcache, not required for functionality, but enabling it measurably speeds up PHP execution. Our PHP performance optimization guide covers how to configure it properly once it’s on.
- intl, powers date, currency, and language formatting for multilingual sites.
How to Verify an Extension Is Actually Enabled
Don’t just trust the checkbox. Confirm the extension loaded correctly:
- Create a file called
info.phpin your site’s root containing<?php phpinfo();, visit it in a browser, and search the page (Ctrl+F) for the extension name. Delete the file once you’re done, since phpinfo() exposes server details you don’t want public. - If you have SSH access, run
php -mto list every loaded module from the command line. - WordPress users can check Tools > Site Health > Info, which lists active PHP modules under the Server section.
Still Not Working? Common Causes
If you’ve followed the steps to enable PHP extensions in cPanel and the error is still showing, check these before contacting support.
- Wrong PHP version selected. If your site runs PHP 8.1 but you enabled the extension under PHP 8.2, it won’t apply. Double-check the version dropdown before making changes.
- Caching. Clear any object cache or OPcache after enabling an extension. On LiteSpeed hosting, purge LSCache from the admin bar as well.
- Extension genuinely unavailable on shared hosting. Some budget hosts restrict certain extensions account-wide. If it’s missing from both Select PHP Version and PEAR, contact your host directly.
Frequently Asked Questions
Do I need SSH access to enable a PHP extension in cPanel?
No. The Select PHP Version interface handles the most common extensions entirely through the browser. SSH is only useful for verifying the result with php -m, not for enabling the extension itself. That’s the fastest way to enable PHP extensions in cPanel for most people.
Why is a PHP extension missing from the Select PHP Version list?
Not every extension ships as a checkbox. Less common ones are usually installable through the PHP PEAR Package manager instead, or may need to be compiled in by your host on a VPS.
Will enabling a PHP extension slow down my site?
Enabling an extension you actually need has negligible performance impact. What does affect performance is leaving unused extensions active across many accounts on shared infrastructure, which is a hosting-level concern, not something to worry about on a single site.
Do I need to restart anything after enabling an extension in cPanel?
No server restart is required. cPanel applies the change to new PHP processes immediately after you click Save.
Need Help With PHP or Server Configuration?
If your site needs deeper server-level PHP configuration beyond how to enable PHP extensions in cPanel, PHP Youth’s team handles PHP tuning, hosting migrations, and full-stack WordPress development for businesses worldwide. Contact PHP Youth for hands-on support.
For a deeper look at getting the most out of PHP on a high-traffic site, see our full PHP performance optimization guide. And if you manage a server through WHM instead of cPanel, our guide to enabling PHP modules in WHM covers the same process at the server level.
Discover more from Master WordPress with Free Tutorials & Guides
Subscribe to get the latest posts sent to your email.

13 thoughts on “How to Enable PHP Extensions in cPanel (Step-by-Step Guide)”
Loving the info on this website , you have done outstanding job on the content.
Thanks, Ashlyn
Feel free to ask anything
If some one needs to be updated with newest technologies
therefore he must be go to see this web site and be
up to date everyday.
Today, while I was at work, my sister stole my iPad and tested to
see if it can survive a twenty five foot drop, just so she can be a youtube sensation. My apple ipad is now
destroyed and she has 83 views. I know this is entirely off topic but I had
to share it with someone!
Great, 83 views? Nice but sorry for your ipad
My brother suggested I might like this blog. He was entirely right.
This post actually made my day. You cann’t imagine just how
much time I had spent for this info! Thanks!
That’s really nice, I’m glad that my post solved your problem. Feel free to ask your queries, and I’m will be happy to answer your questions. Please commenting and Sharing.
It is really Awesome!!! Today I have learned something new and this post solved my problem. Thank you so much for sharing such an amazing and problem solving post. I like it!!!
Thanks Sakshi… Keep learning, sharing and commenting
It works great.
Thank you so much.
That’s great Amit. Thanks for your comment. Keep learning and sharing
Pingback: PHP Performance Optimization: 7 Proven Fixes for High-Traffic Sites
Pingback: Enable PHP Modules in WHM: 2 Simple Methods (2026)